Synchronizing multiple Google or Microsoft calendars is easy with the right tool. Here’s the best one we found.
If you only have one Google or Microsoft calendar to manage, consider yourself among the lucky few. Though every digital calendar has its unique complexities, those complexities are exponentially magnified when you’re trying to juggle more than one.
As a company that sees a lot of interim leadership roles, we know firsthand that managing multiple calendars isn’t an option. Each person on our team has their own calendar, and we’re usually handling one or two more calendars per client when we assume accounts on their selected platform. You can imagine how hairy things can get when trying to ensure continuity across the board, along with the added challenge of toggling between Google and Microsoft tools (they’re similar but certainly not the same).
In an effort to maintain harmony between multiple calendars, we put several tools to the test, from IFTTT to Microsoft Flow, and found that the most straightforward one is SyncGene.
What Is SyncGene?
SyncGene is a syncing service we found that takes the guesswork out of managing multiple calendars. Once you set it up, SyncGene syncs your calendar items across the apps and devices you use so you can avoid manually entering items into multiple calendars. You can try it free for a week, then pay just $5.80 per month after that for ongoing synchronization. Alternatively, you can maintain the free version, which allows you to have two sources to sync and a limited number of manual syncs each month.
What we love about SyncGene is that we can sync up calendar items across different platforms. This is a major win, as we work with interim leaders who may be using Google while the company may be on Microsoft. Neither party has to change from its preferred platform, and both can be on the same page without jumping through hoops.
Before moving forward, we’d like to note that this is not a sponsored review of SyncGene. We’ve never contacted the company and doubt they’ll ever read this. We chose SyncGene based entirely on its simplicity for syncing calendars, and we hope you find it as easy to use as we have.
Now, let’s go through a brief tutorial on how you can leverage SyncGene to sync your Google and Microsoft calendars in just a few minutes.
Using SyncGene with Your Google Calendar
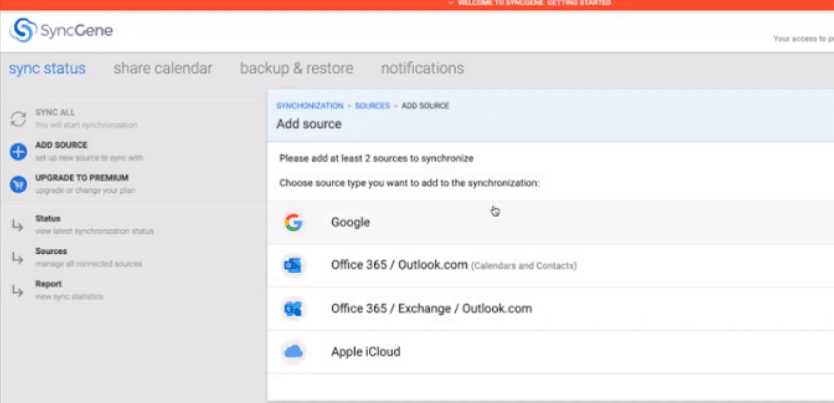
Go to SyncGene and click the Signup button at the top of the page. To streamline the process, you can sign up with Google (this allows you to log in with your Google account), or you can do it the old-fashioned way. Once you’re in, you should be immediately directed to the Add Source page that will allow you to choose email accounts to synchronize.
Something we learned through trial and error is that just because you log in with your Google account doesn’t mean you’ve added it as a source for syncing. You’ll still need to manually add each account that you want to sync.
Select Google to sync your Google calendars, then click on the other Google account you wish to sync. You’ll be prompted to log in if you’re not already logged into that account. SyncGene will request permission to access the account―click the Allow button at the bottom of the pop-up.
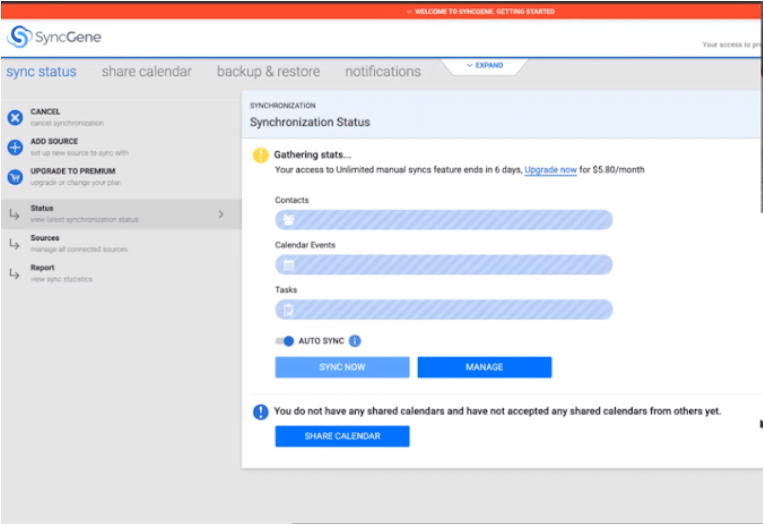
Once you’ve added multiple accounts to your SyncGene account, click the Start Synchronization button to start syncing your accounts. SyncGene also gives you the option to back up your data. If you select this option, you’ll need to grant the app permission to access your Google Drive. The syncing process covers your contacts, calendars, and tasks.
The whole process from signup to sync takes about five minutes. If you opt for the paid version, you’ll notice a toggle switch for Auto Sync, which will continue to sync your sources without any manual effort from you.
Syncing Your Microsoft Calendar with SyncGene
Got Microsoft instead of Google (or perhaps one of each)? Syncing your Microsoft calendar follows the same process. Once you sign up for a SyncGene account and log in, it directs you to the Add Source page. You must add at least two sources before you can proceed (since you can’t sync just one calendar!).
Click on the Add Source button, then select Office 365 / Exchange / Outlook from the list. SyncGene will prompt you to input your Exchange Outlook account login information, then click Add Source. Repeat this process to add another Office 365 / Exchange / Outlook account or use the steps above to add a Google account.
If you’re using the paid version, you can add more than two sources to synchronize. The free version only allows two sources and one calendar.
Once you’ve added your sources, click the Start Synchronization button. We tried syncing a Microsoft calendar with a Google account, and it took about five minutes to complete the synchronization.
Final Thoughts on SyncGene
One thing we noticed is that there’s no way to tell which calendar an item originated from. So, if we’re looking at, say, a Google calendar, we’re not sure which appointments were already there and which ones were carried over from Microsoft. This might not be a big deal for most people who simply want to consolidate their calendar items, but it’s worth mentioning.
Something else we noticed is that the consolidated calendar gives a lot of detail about each item listed within the calendar. For example, on our clients’ calendars that we manage, we don’t really need visibility into the specifics of each appointment on their calendar. People looking at this calendar to check availability should be able to see empty time blocks but not the details of booked time slots.
Overall, SyncGene is a very straightforward tool if you want to consolidate calendars. Its freemium version is pretty powerful, and if you only need to sync two accounts, then you may not need to upgrade. But the paid version is less than $70 a year, and given the time and hassle it can save, it’s well worth the cost.
For more insights, head back to Our Collective POV.


